Intel SGX
 概要
概要
Intel SGX (Intel Software Guard Extensions) はハードウェアによって暗号化されたメモリ領域を提供する TEE (trusted execution environment) 技術の一つである。クラウド環境やユーザの手元の PC といった信頼性の保証できない環境において、機密性の高いアプリケーションコードやデータを暗号化された空間に隔離し安全に動作できるようになる。
Table of Contents
特徴
Overview of Intel® Software Guard Extensions Instructions and Data Structures より。
- 機密性の高いコードを Enclave に隔離して実行する。
- CPU のみを信頼する: 透過的なメモリ暗号化と 18 個の新しい命令。
- Enclave はシステムに脅威を与えない: 非特権コードのみ (CPU Ring3) 実行可能、メモリ保護あり。
- マルチコアシステム設計: Enclave のマルチスレッド実行、Enclave と非信頼コードの並行実行、Enclave は割り込み可能。
- プログラミングリファレンスあり。
SGX に対応したアプリケーションが保護メモリ空間で実行したいライブラリのロードを要求すると、保護メモリ空間にアプリ用の Enclave が割り当てられ、その隔離された空間にライブラリがロードされる。保護されていない通常の実行を行うコードとは (SGX の命令を介するものの) 関数レベルで相互に呼び出しが可能である。
Enclave 上で実行されるコードの本体は署名された共有ライブラリである。このライブラリは通常の C/C++ で開発できるが、SGX 用の関数呼び出し命令が必要であったり、サイドチャネル攻撃などを防止する目的でいくつもの標準関数 (つまり libc.a に含まれるような関数) を置き換える必要があることから SGX SDK をインストールする必要がある。
Enclave 内では特権モードを必要とする命令を実行できないため、周辺ハードウェアのアクセスや OS のシステムコール全般を利用できない。つまりコンソールやファイル/ソケットの入出力、OS 乱数生成、スレッドの生成、シグナル操作などを Enclave 内で行うことができない。このような処理が必要であれば、Enclave の外に用意した関数を呼び出して代行させることができる (当然ながらその領域に露出した情報は保護されない)。典型的な例は Enclave 内からのデバッグログ出力である。
SGX は二次記憶装置のような永続的なストレージを提供していない。Enclave 内で生成した機密情報を保存する場合、SGX API を使って暗号化した上で外部のストレージなどに保存する。例えば Enclave 内で Ed25519 秘密鍵を生成し、SGX API で暗号化して非保護領域に渡してファイルに保存することで、暗号化された鍵が流出しても復号化できないし、このマシンの特定の Enclave 内以外では復号化できないように設計することができる。
Enclave
SGX における Enclave とはハードウェア暗号化によって保護されたメモリ領域である。このメモリ領域にロードされたアプリケーションコード、およびそれが実行時に扱うデータはハードウェアに含まれる鍵によって暗号化される。ただし、暗号化はメモリ上の Enclave 内だけで CPU は復号化された命令やデータを処理するため、実行速度は通常のアプリケーションと同程度である (準同型暗号のように暗号化したまま演算するわけではない代わりに極端な遅さはない)。
SGX の機構はハードウェア起動時に PRM (processor reserved memory) と呼ばれる領域を確保し、その中の一部を EPC (enclave page cache) に割り当てる。Enclave として使用できるメモリサイズの上限はこの EPC のサイズまでである。PRM のサイズはハードウェアや BIOS に依存し、ほとんどの SGX 対応ハードウェアは 128MB か 256MB を利用できる。ただし Xeon プロセッサの一部のモデルでは 512GB (2CPU で最大 1TB) を割り当てることもできる。
具体的に EPC に何 MB 割り当てられているかは後述するテストプログラムの実行結果から1調べることができる。また Enclave のビルド時の出力からどれくらいの領域を必要とするかを知ることができる。
安全性
メモリ暗号化に使用される鍵は耐タンパー性のある CPU の回路に組み込まれているため取り出すことはできない。
Enclave のメモリ暗号化技術により、何らかの手段でメモリが読み取られても情報を復号化できないし、命令を書き換えて不正な位置にジャンプさせるようなこともできない。
ただし SGX では CPU に対する保護はなく CPU の動作が信頼できることを前提としている。SGX Spectre のような一部のサイドチャネル攻撃は依然として残ったままである。この意味で堅牢さに関しては HSM に準ずると言われている。
ユースケース
Intel SGX は、コンシューマ向けには 4k Blu-ray の DRM (digital right management) に使われている。またエンタープライズ向けでは HSM (hardware security module) や CloudKMS のようなものを開発することができる。
現在のところ Intel SGX は一部の Xeon プロセッサで利用可能である。Core シリーズでは 10th 世代 (Q1'21) までは使用できたが、今後 Core では対応しないと報道されている。どのモデルが対応しているかは Intel Processor List の Intel ME または Intel SPS で確認することができる (ただし、このリストに乗っていなくても対応しているモデルも有る)。
バックアップ
ハードウェア故障に備えて暗号化された機密情報をどうバックアップ/リストアするのか、あるいは暗号化された機密情報を複数のマシンでどう共有するのかについて SGX は特にソリューションを提供していない。CPU に封印された鍵をバックアップすることはできないため、必然的に、機密情報の暗号化に使用した鍵をバックアップするというアプローチになる。
Intel としては、機密情報のバックアップはリモートアテステーション (remote attestation) を使用するのが定番の方法だろう (導入事例がどれほどあるか知らないので断言はできないが)。ただし、例えば SGX マシン間で DH 鍵交換や公開鍵暗号を使って機密情報を暗号化した上でインポート/エクスポートを行うような仕組みを実装することができる。
Intel SGX 開発環境の構築
ここでは Intel SGX Software Installation Guide for Linux を参考に Intel NUC + Ubuntu 20.04 環境にプレビルドされたバイナリをインストールする。
Intel SGX を使用するには CPU、マザーボードと BIOS/UEFI でのサポートが必要である。ただし、プラットフォームのハードウェアが SGX をサポートしていなくても、シミュレーションモードで動作させたり開発を行うことができる (当然ながらシミュレーションモードではセキュリティは保証されない)。
Linux での SGX のソフトウェアスタックは、1) SGX ドライバ、2) SGX SDK、3) SGX PSW の 3 つで構成されている。SGX ドライバと SDK は https://download.01.org/intel-sgx からダウンロードしたインストーラーを実行する。
ハードウェアサポートの確認
ハードウェアが SGX をサポートしているかは cpuid コマンドを使用して確認することができる。以下の例では SGX をサポートしており FLC (flexible launch control) はサポートしていないことが分かる。
torao@beryl:~$ cpuid | grep -i sgx
      SGX: Software Guard Extensions supported = true     ← 💖
      SGX_LC: SGX launch config supported      = false    ← 💔
   Software Guard Extensions (SGX) capability (0x12/0):
      SGX1 supported                         = false
      SGX2 supported                         = false
      SGX ENCLV E*VIRTCHILD, ESETCONTEXT     = false
      SGX ENCLS ETRACKC, ERDINFO, ELDBC, ELDUC = false
      SGX: Software Guard Extensions supported = true
      SGX_LC: SGX launch config supported      = false
...
また SGX-hardware list に含まれているテストプログラムを実行してより詳細な情報を確認することもできる。sgx available: 1 かつ sgx N supported: 1 と表示されれば Intel SGX を利用できる環境である。sgx available: 0 なら CPU が対応しておらず、また sgx N supported: 0 なら BIOS で無効化されていて利用できないことを意味している。sgx launch control には FLC をサポートしているかが 0/1 で表示される。
上記において EPC が 94MB であることから Enclave のメモリ空間で使用できる最大サイズは 94MB であることがわかる。
PRM 領域はハードウェア起動時から専有され一般のアプリケーションから利用できないため BIOS のデフォルト設定で SGX が無効化されていることがある。SGX 対応ハードウェアでありながらテストプログラムで sgx N supported: 0 と表示されている場合は BIOS 設定を確認する必要がある。
SGX ドライバのインストール
OS やアプリケーションは最終的に SGX ドライバを介してハードウェア SGX の機能を利用する。シミュレーションモードのみで使うのであれば SGX ドライバは必要ではなく、このセクションはスキップしても良い。SGX ドライバをインストールする前にプラットフォームでどのドライバが適合しているかを調べる必要がある。
まず SGX の起動制御 (launch control) には以下の 2 つの方式がある。
- Flexible Launch Control (FLC): ドライバが Enclave ごとに動的に起動制御を構成する。FLC で動作する場合は Launch Token は必要ない。
- Legacy Launch Control: Intel SGX Launch Control をサポートしていないプラットフォームプラットフォーム向け。Enclave をロードするためにドライバに Launch Token を渡す必要がある。また Enclave をリリースモードで実行するには Enclave 所有者の MRSIGNER (署名の公開鍵のハッシュ値) を Launch Policy List に追加する必要がある。
FLC をサポートしているかの確認は cpuid | grep -i sgx で行うことができる。もし SGX_LC: SGX launch config support = true の項目があればそのハードウェアは FLC をサポートしている。今回の例で使用するマシンは FLC をサポートしていないため Legacy Launch Control である。
torao@beryl:~$ cpuid | grep -i sgx
      SGX: Software Guard Extensions supported = true
      SGX_LC: SGX launch config supported      = false    ← ✅
...
次に、Linux 用の SGX ドライバには以下の 3 種類がある。
- In Kernel ドライバ: Linux Kernel 5.11 以降には SGX In-Kernel ドライバが標準で含まれている (この件についてはカーネル開発が方針転換しているかもしれないので最新情報の確認が必要)。プラットフォームの Flexible Launch Control サポートが必要なドライバ。
- DCAP ドライバ: Linux Kernel 4.15 から 5.6 までで Flexible Launch Control をサポートするプラットフォーム向け。
- Out-of-tree ドライバ: Legacy Launch Control のみをサポートするプラットフォーム向け。
今回の例で使用するプラットフォームは FLC をサポートしていないことから Out-of-tree ドライバを使用する必要がある。
Out-of-tree ドライバのインストール
Out-of-tree ドライバおよび DCAP ドライバはプレビルドされたインストーラーが利用できる。
torao@beryl:~$ sudo apt install -y build-essential ocaml automake autoconf libtool wget python libssl-dev

torao@beryl:~$ wget "https://download.01.org/intel-sgx/latest/linux-latest/distro/ubuntu20.04-server/sgx_linux_x64_driver_2.11.054c9c4c.bin"
torao@beryl:~$ sudo bash sgx_linux_x64_driver_2.11.054c9c4c.bin
Unpacking Intel SGX Driver ... done.
Verifying the integrity of the install package ... done.
Installing Intel SGX Driver ...
...
uninstall.sh script generated in "/opt/intel/sgxdriver".
ここで、ダウンロードするインストーラーはディレクトリを表示して最新版のファイル名を指定すること。ここで Out-of-tree ドライバの sgx_linux_x64_driver_2.xx.xxxxxxxx.bin と DCAP ドライバの sgx_linux_x64_driver_1.xx.bin で名前が紛らわしいので注意。
上記の手順を終えて再起動すると /dev/isgx および /dev/mei0 という 2 つのデバイスファイルが現れる。
torao@beryl:~$ ls -l /dev/{isgx,mei0}
crw-rw-rw- 1 root root  10, 58 Apr  7 20:27 /dev/isgx
crw------- 1 root root 237,  0 Apr  7 20:27 /dev/mei0
トラブルシューティング
再起動しても /dev/isgx と /dev/mei0 が現れない場合は BIOS 設定で次の 2 点を確認する。
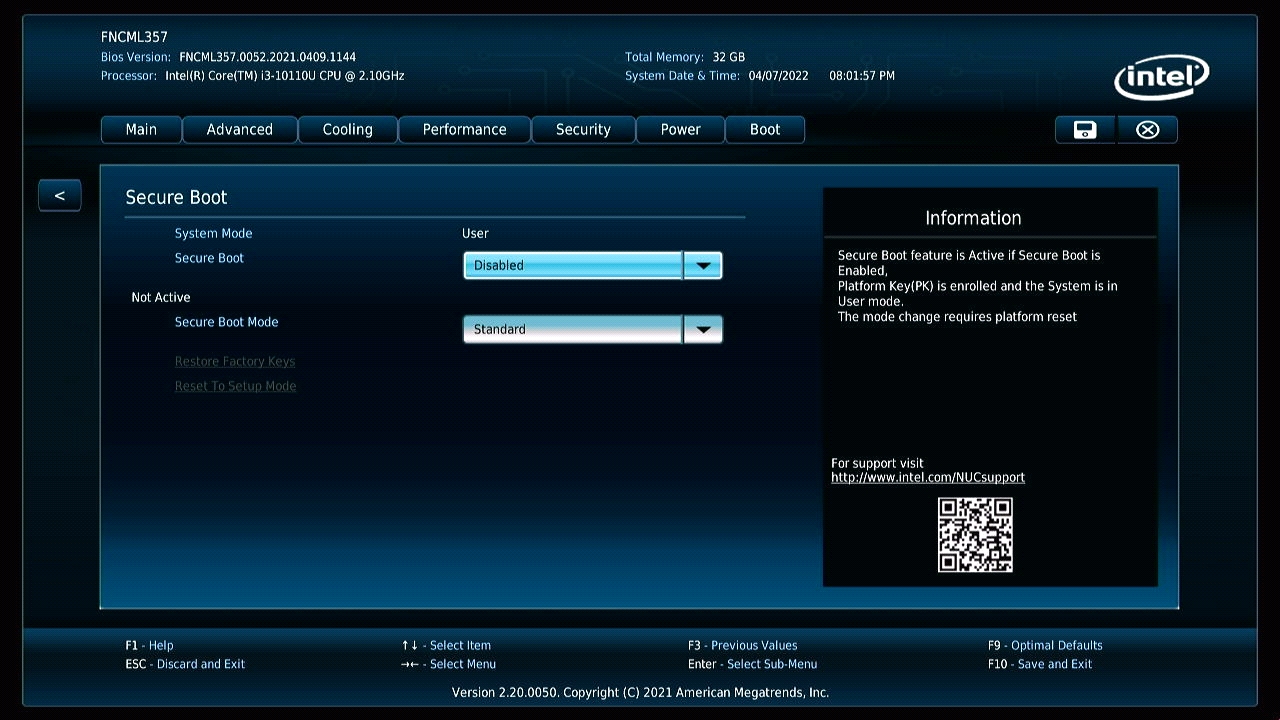
詳細は調べていないが Secure Boot を有効化にしていると Out-of-tree ドライバの動作が Secure Boot によって阻害されるように見える。この場合、起動時に systemd[1]: Failed to start Load Kernel Modules. というメッセージが表示され、SGX に関するログが出力されなくなる。
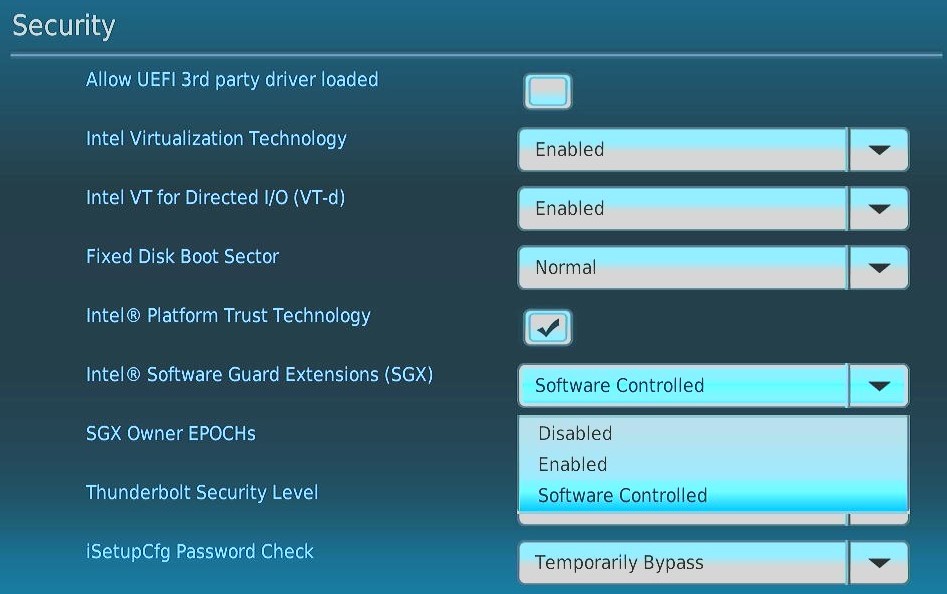
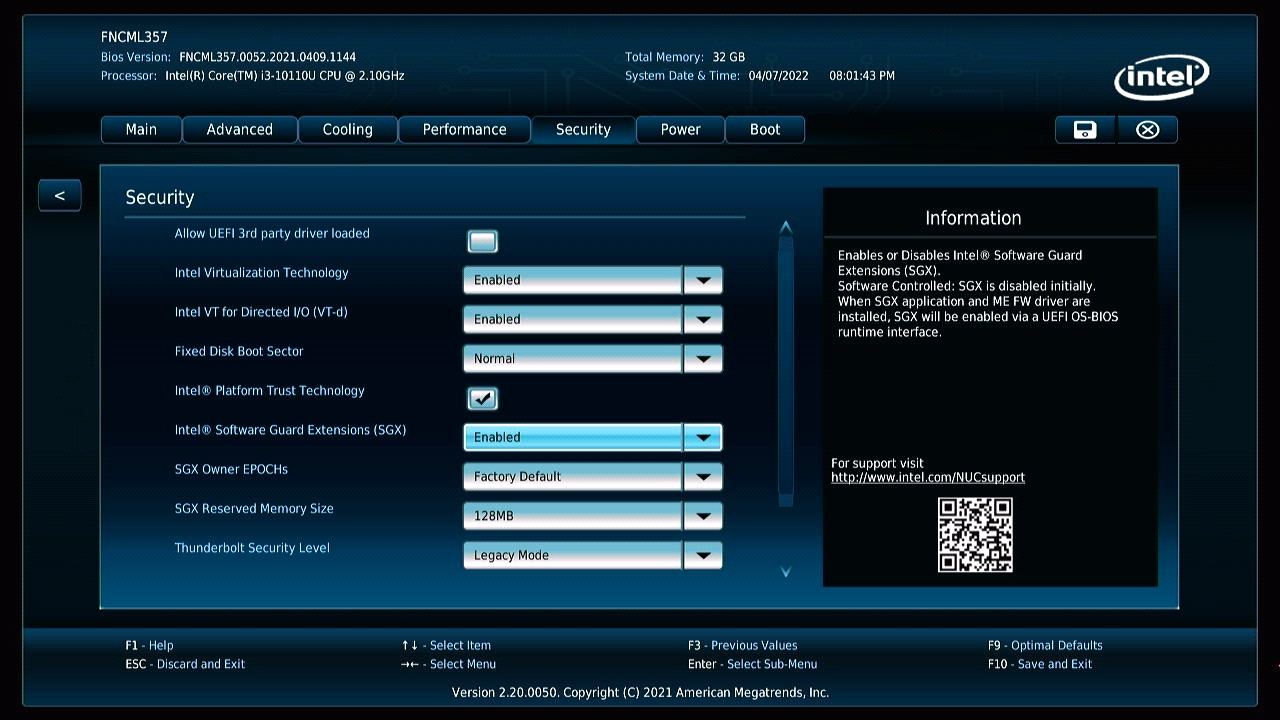
Secure Boot を無効化して上記のメッセージが表示されなくなっても、intel_sgx: SGX is not enabled と表示されデバイスファイルが現れないことがある。これは SGX を Disabled または Software Controlled にしているときに表示されるメッセージである (Linux の Out-of-tree ドライバは Software Control に対応していないのかもしれない)。これは BIOS で SGX を明示的に Enabled にすることで回避できる。
torao@beryl:~$ dmesg | grep -i sgx
[    3.424384] isgx: loading out-of-tree module taints kernel.
[    3.426668] isgx: module verification failed: signature and/or required key missing - tainting kernel
[    3.428153] intel_sgx: SGX is not enabled
最終的に、正常にデバイスファイルが現れると SGX に関する起動ログは以下のように出力される。まだ署名鍵を登録していないので検証に失敗しているがここでは無視する。
torao@beryl:~$ dmesg | grep -i sgx
[    3.258624] isgx: loading out-of-tree module taints kernel.
[    3.260078] isgx: module verification failed: signature and/or required key missing - tainting kernel
[    3.261583] intel_sgx: Intel SGX Driver v2.11.0
[    3.261597] intel_sgx INT0E0C:00: EPC bank 0x70200000-0x76000000
[    3.270327] intel_sgx:  can not reset SGX LE public key hash MSRs
[    3.270381] intel_sgx: second initialization call skipped
SGX PSW のインストール
SGX PSW (platform software) は SGX SDK に対する、いわゆるランタイムである。これは apt にリポジトリを追加してインストールすることができる。
torao@beryl:~$ sudo vim /etc/apt/sources.list.d/intel-sgx.list
deb [arch=amd64] https://download.01.org/intel-sgx/sgx_repo/ubuntu focal main
torao@beryl:~$ wget -qO - https://download.01.org/intel-sgx/sgx_repo/ubuntu/intel-sgx-deb.key | sudo apt-key add -
torao@beryl:~$ sudo apt update
torao@beryl:~$ sudo apt install -y libsgx-enclave-common libsgx-urts sgx-aesm-service libsgx-uae-service
SGX SDK のインストール
SGX SDK は SGX ドライバと同様にダウンロードディレクトリを表示して最新版のインストーラーをダウンロードして実行する。
torao@beryl:~$ sudo apt-get install -y build-essential ocaml automake autoconf libtool wget python libssl-dev

torao@beryl:~$ wget "https://download.01.org/intel-sgx/latest/linux-latest/distro/ubuntu20.04-server/sgx_linux_x64_sdk_2.16.100.4.bin"
torao@beryl:~$ sudo bash sgx_linux_x64_sdk_2.16.100.4.bin --prefix=/opt/intel
Unpacking Intel SGX SDK ... done.
Verifying the integrity of the install package ... done.
Installing Intel SGX SDK ... done.
/tmp/sgx-sdk-5kHnQ8 /home/torao
install -d /opt/intel/sgxsdk
cp -r package/* /opt/intel/sgxsdk
install -d /opt/intel/sgxsdk/scripts
install scripts/* /opt/intel/sgxsdk/scripts
chmod +x /opt/intel/sgxsdk/bin/sgx-gdb
/home/torao
uninstall.sh script generated in /opt/intel/sgxsdk

Installation is successful! The SDK package can be found in /opt/intel/sgxsdk

Please set the environment variables with below command:

source /opt/intel/sgxsdk/environment
環境設定スクリプトの実行 source /opt/intel/sgxsdk/environment は ~/.bash_profile などに追加すると良いかもしれない。
SDK に含まれるサンプルコードをハードウェア SGX モード (SGX_MODE=HW) またはシミュレーションモード (SGX_MODE=SIM) でビルドして実行できることを確認すれば SGX 開発環境のセットアップは完了である。
torao@beryl:~$ source /opt/intel/sgxsdk/environment
torao@beryl:~$ cp /opt/intel/sgxsdk/SampleCode/LocalAttestation . -r
torao@beryl:~$ cd LocalAttestation/
torao@beryl:~/LocalAttestation$ sudo make SGX_MODE=HW
...
The project has been built in hardware debug mode.
torao@beryl:~/LocalAttestation$ cd bin
torao@beryl:~/LocalAttestation/bin$ ./app
succeed to load enclaves.
succeed to establish secure channel.
Succeed to exchange secure message...
Succeed to close Session...
SGX SDK/PSW のソースビルド
SGX SDK と SGX PSW はプレビルドされたインストーラーを使用する代わりにソースビルドを行うこともできる。手順は以下の Dockerfile を手作業で入力するだけなので難しくないだろう。ただし、完了までに 30 分から 1 時間程度の時間を要する。
このソースビルドは cp のステップでシステム標準の ar や ld を置き換えるため、クリーンインストール可能な専用マシンを用意するか、隔離された Docker コンテナ上で行うことを推奨する。
シミュレーションモードのみで使うのであれば上記の Dockerfile からコンテナを作成してもよいだろう。
torao@beryl:~/git$ git clone https://github.com/torao/sample.intel-sgx.git
torao@beryl:~/git$ cd sample.intel-sgx
torao@beryl:~/git/sample.intel-sgx$ docker build --target sgxsdk -t sgxsdk .
torao@beryl:~/git/sample.intel-sgx$ docker build --target sgxpsw -t sgxpsw .
torao@beryl:~/git/sample.intel-sgx$ docker images
REPOSITORY           TAG       IMAGE ID       CREATED          SIZE
sgxpsw               latest    86475dee36dc   28 seconds ago   2.4GB
sgxsdk               latest    17d8928e1f1b   31 minutes ago   1.04GB

torao@beryl:~/git/sample.intel-sgx$ docker run -it --name sgxsdk -v `pwd`:/opt/local sgxsdk
root@c17231c0d758:/opt/local# cd samples/hello-world
root@c17231c0d758:/opt/local/samples/hello-world# make
root@c17231c0d758:/opt/local/samples/hello-world# ./hello-sgx
>> hello, I'm Voldo
<< hello, I'm Voldo
root@c17231c0d758:/opt/local/samples/hello-world# exit

torao@beryl:~/git/sample.intel-sgx$ docker run -it --name sgxpsw -v `pwd`:/opt/local sgxpsw
root@41538a4a2879:/opt/local# cd samples/hello-world/
root@41538a4a2879:/opt/local/samples/hello-world# ./hello-sgx
>> hello, I'm Voldo
<< hello, I'm Voldo
Docker コンテナでのハードウェア SGX の実行
ハードウェア SGX は Docker コンテナ内からでも利用することができる。ただし、Docker コンテナにデバイスファイル /dev/isgx と /dev/mei0 を公開する必要があるため、ホスト側で SGX ドライバのインストールが必要である。
github.com/tozd/docker-sgx は SGX ドライバ (Out-of-tree ドライバ) をインストールした Docker ホスト上で動作することを確認している。ただし Dockerfile で説明なく行っている数多くの手順を把握していないので内容は省略する。
Intel SGX 開発
開発環境が準備できたら SGX アプリケーションを開発してみよう。もちろん、先述の通りハードウェアサポートがない環境でも SDK のシミュレーションモードでコンパイルして実行することができる。
SGX 開発と実行の概要
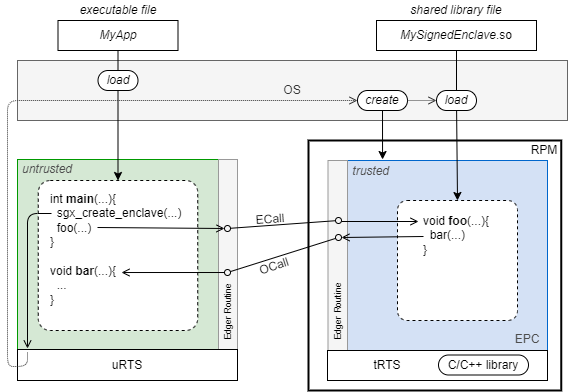
SGX アプリケーション開発の当面のゴールは以下の 2 つのファイルを作成することである。
- 暗号化されていないメモリ空間で実行される通常の実行ファイル、または静的ライブラリや共有ライブラリ
- 暗号化されているメモリ空間で実行される Enclave 共有ライブラリ
SGX の Edger Routine はこれらが実装している機能を通常のライブラリと同じように互いに呼び出すことのできる機構である。
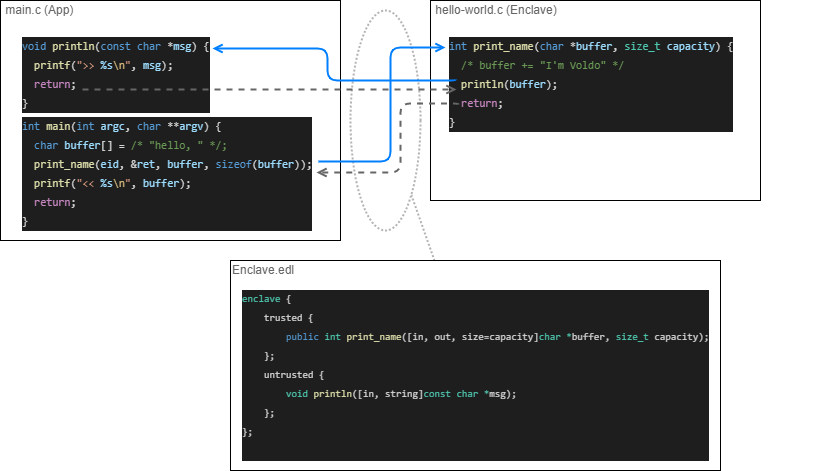
開発者は Untrusted なメモリ空間で実行される App コードと、Trusted なメモリ空間で実行される Enclave コードを作成し、それらの間で互いに呼び出し可能な関数を定義した EDL ファイル (IDL の Enclave 版) を作成する。この EDL は App, Enclave のコンパイル前に
App コードは gcc や g++ を使って一般的な実行ファイル (または静的ライブラリ libXXX.a や共有ライブラリ YYY.so) にビルドすることができる。他方、Enclave コードは共有ライブラリとしてビルドしたあと、秘密鍵で署名することで Enclave 上で動作することができる。
この署名用の秘密鍵は実行環境にデプロイする必要ないが、リリース後は一般的な秘密鍵と同様に安全に管理しておく必要がある (HSM のようなものを使うことが推奨されている)。また、SGX は暗号化されたメモリ空間でプログラムを実行する機構であり、署名済み Enclave 共有ライブラリファイル自体は暗号化されないことに注意。秘密鍵や乱数シードのような秘匿情報を Enclave 共有ライブラリのソースコードにハードコードしてはならない。

Fig 5 は開発者が作成する必要のあるソースファイル、中間ファイルと、実行環境での配置を示している。Edger8r や Enclave 署名用のコマンドは SGX SDK に含まれている。
サンプルのビルドと実行
SGX SDK をインストールしたら Docker container for Intel SGX SDK リポジトリを clone してサンプルの hello, world を実行してみよう。ハードウェア SGX 環境をセットアップしたのであれば SGX_MODE=HW とすることでハードウェア SGX を使用するようになる。
torao@beryl:~/git$ source /opt/intel/sgxsdk/environment
torao@beryl:~/git$ git clone https://github.com/torao/sample.intel-sgx.git
torao@beryl:~/git$ cd sample.intel-sgx/samples/hello-world
torao@beryl:~/git/sample.intel-sgx/samples/hello-world$ make SGX_MODE=SIM
...
The required memory is 3952640B.           ← ✅
The required memory is 0x3c5000, 3860 KB.  ← ✅
...
torao@beryl:~/git/sample.intel-sgx/samples/hello-world$ ls -laF
total 388
drwxrwxr-x 4 1000 1000   4096 Feb 24 20:02 ./
drwxr-xr-x 1 root root   4096 Feb 23 12:15 ../
drwxrwxr-x 2 1000 1000   4096 Feb 24 20:02 App/
drwxrwxr-x 2 1000 1000   4096 Feb 24 20:02 Enclave/
-rw-rw-r-- 1 1000 1000   4390 Feb 24 19:54 Makefile
-rw-rw-r-- 1 1000 1000    252 Feb 24 19:54 README.md
-rwxr-xr-x 1 root root  24464 Feb 24 20:02 hello-sgx*           ← ✅
-rw-r--r-- 1 root root 170008 Feb 24 20:02 myenclave.signed.so  ← ✅
-rwxr-xr-x 1 root root 170008 Feb 24 20:02 myenclave.so*
torao@beryl:~/git/sample.intel-sgx/samples/hello-world$ ./hello-sgx
>> hello, I'm Voldo
<< hello, I'm Voldo
make で実行ファイルと Enclave の署名済み共有ライブラリ (この場合はシミュレーションモード) がビルドされる。この過程で Enclave に必要なメモリサイズが表示されるのでハードウェアが提供する EPC (この記事の例では 94MB) を超えていないことを確認する。
作成された hello-sgx を実行すると App から Enclave の呼び出しを経由したメッセージ出力と、その呼び出し結果として同じメッセージがリターンバッファに設定されていることが確認できる。アプリと Enclave 間の相互の呼び出し方法が理解できれば、あとは利用可能な SGX API を使ってアプリケーションを実装するだけである。
Makefile
Makefile は Fig 5 で示しているビルド手順を実装している。詳細な説明は省略するが、Enclave のビルドと署名、アプリのビルドに分かれている。
署名鍵の作成
Enclave の署名に使用する公開鍵は 3072-bit RSA (exponent=3) のみであることに注意。openssl を使用して以下のように作成することができる。プロダクションリリースではこの署名鍵は通常の秘密鍵と同等に扱う必要があるため HSM のようなソリューションを使用することが推奨される。
root@bbbf333c6ffc:/opt/local# openssl genrsa -3 3072 > Enclave/Enclave.private.pem
Generating RSA private key, 3072 bit long modulus (2 primes)
.......................................................................................................++++
..........++++
e is 3 (0x03)